Wednesday, 28 March 2012

Pysanka Workshop!


Last year we held an informal pysanka party at Hollie's house. None of us were experts, but with the help of some research and library books, we were able to have a whole bunch of fun and create some beautiful eggs.

This year the Beehive and Needlework are teaming together with the Kosa Kolektiv ladies of Toronto to host another pysanka party. And you're invited! We're super excited to have the ladies of the Kosa Kolektiv coming to share their knowledge of this practice. Here's a little bit about them:

Kosa Kolektiv is composed of several ladies in and around Toronto that aim to revitalize peasant folklore in an urban context. We do this by singing songs, sewing, cooking, planting, crafting, putting on workshops and sharing ideas over tea and good food. There’s something to be said for the simpler pleasures in life, and Kosa Kolektiv embraces them.


Love! They definitely seem to share the same values and interests that we have. How exciting and inspiring!


So come discover pysanka, the art of decorating eggs in the traditional Ukrainian style! Forty percent of the proceeds will go to the Pysanka Home for orphans in Potelech, Ukraine. Space is limited, and a material fee of $20 is required to attend. If you'd like to join us, please contact Needlework via email (hello@iloveneedlework.com), phone (905-667-5663), or in person so we can sign you up.

Thursday, 8 March 2012

Crepe Paper Flowers

Recently, February 18th to be exact, I got married! I decided pretty early on that I wanted to keep everything simple. So, of course I decided to make most of the décor; the bouquets, the boutonnieres, and the centre pieces.

While never being a huge fan of flowers, despite working in a flower shop, I still wanted to have the traditional bouquets and boutonnieres but made out of something a little different. I scoured the internet looking for ideas. I found bouquets of brooches, of felt flowers and of flowers made from panty hose stretched over wire, but none of them really appealed to me until I saw flowers made out of tissue and crepe paper. Practically all were found on the Martha Stewart Weddings website where I immediately discovered the perfect design was the Tissue Bubble Flower. I altered it to crepe paper instead of tissue because I wanted it to be less delicate.

Crepe Bubble Flowers

Materials: 
Floral wire
Floral tape
Thin cotton yarn or artificial stamens
White glue


Tools:
Scissors
Needle nose pliers
Golf ball or other spherical object

Making the Petals

The size of your spherical object determines your petal size. Measure the circumference of your object. Create a cardstock template using that measurement for the length and slightly less than half for the width. For instance I used a golf ball that is 5½” making my width 2½”. This accommodates the stretch of the crepe paper as you shape the petals around the spherical object.

Next cut out 5 pieces of crepe paper per flower with the grain running lengthwise.

Centre the golf ball in the piece of crepe paper and pull paper up the sides of the golf ball slightly stretching it into shape. Then twist up the long ends one at a time much like you would twist up a candy wrapper, but making sure you twist it all the way to the end.

Once both ends are twisted carefully remove the sphere and put a dab of white glue at the base of each twist. This will hold the twist and the shape of the petal once assembled.

Repeat the above steps four more times, you will need 5 petals in total for each flower, and set them aside in a safe place for the glue to dry.

Making the Stems

I made my stamen using 2” lengths of yellow cotton yarn. I needed six lengths that I would divide into pairs and tie small knots into either end. You can use anything that you have on hand like yellow tissue paper or ribbon, let your imagination be your guide.

Cut a length of floral wire the desired length, I cut mine to 10”, and wrap with floral tape. This base of tape helps later on when assembling.

Fold over ½” about 120o from one end of the wire, centre the stamen in the fold and pinch the wire around the stamen. Fold the stamen up and tape around the base to hold them in place.

 Assembling the Flower

Position the first petal with the stamen centered in the petal and secure with floral tape.

Position the second petal so that it is hugging the first petal, so roughly half of the first petal is covered by the second and secure with floral tape.

Continue adding the petals in the same way. The last petal will be over the fourth and under the first. Now that all the petals are in place wrap the base of the flower with floral tape several times to make sure that the petals stay in place.

Clip off the twists at the tops of the petals and gently pull and twist the petals to open the flower.

Voila!

Friday, 2 March 2012

Collective Buzz at Craft and the New Economy Symposium

Us!

The Beehive is big on sharing skills, knowledge, and inspiration. This orientation is a driving force in all of our activities, which are collective endeavours that draw on our individual strengths and backgrounds. We also try to reach out to the community around us to participate in our projects (see Knit Night on the Brain), provide us with space to make stuff (thank you Kieran & The Brain!), and teach us skills that will help us on the path to self-sufficiency.

So when the Ontario Crafts Council approached us about presenting an interactive activity at their upcoming symposium, Craft and the New Economy, we were pretty stoked on this opportunity. We knew we wanted to present a collective making activity, and reflecting on what we had to offer as a group, we decided that we could also share our experience in making a collective.

If you plan to attend the Symposium on March 10, 2012 (which is highly recommended if you are interested in issues in contemporary craft), we invite you to sign up in the morning for Collective Buzz, which will take place at the reception following the Symposium from 6-8pm. Here you'll hear about how the Beehive was formed, how to start a collective in your own community, and we'll provide you with supplies and instructions for making English paper-pieced fabric hexagons. If this is is ringing a bell, Hollie mentioned it in the last post which also hinted enigmatically about the installation proposal we submitted for this year's Supercrawl. Here is another clue about where we are headed with this project: you can hold on to your hexagons made during this session, or you can leave them with us to be included in the installation.

We're excited to share our know-how and learn from Symposium-goers as well. See you there!

Thursday, 23 February 2012

One UnBeelievable Year

Can you bee-lieve (sorry, had to) that the Beehive Craft Collective has been around for a year already? It's flown by in a blur of meetings and workshops and craft fairs and art installations. Not to mention the fact that many of us are full-time makers and/or entrepreneurs in our day-to-day lives. Needlework, Sweet Ice Snow Cones, Bespoke Uprising, Jenna Rose, White Elephant... sometimes it's exhausting to even think about. But that's also the really great part about a collective - the joint support from everyone involved working towards a common goal. I often think about how honoured I am to be a part of a group of such awe-inspiring and talented women.


We're gearing up for some exciting things this year too. We are super excited to be participating in the Craft and the New Economy symposium on March 10th at OCAD University. We'll be doing a pretty informal presentation on how to start a craft collective within your own community, while also providing materials for a crafting circle. We'll have everything you need to join in making paper piecing hexagons, but everyone is encouraged to bring their own projects as well.

Ever since we saw the Quilts! exhibit at the AGH we've all kind of been obsessed with quilting bees and friendship quilts, and this is where our idea stems from. A collective project while discussing forming collectives. We'll be presenting from 6pm-8pm and we hope to see some of you there. It should be an amazing event all around.


We're also working on our submission to be a part of this year's Supercrawl. All we can really say about it at this point is that it will be another large scale textile installation that has the opportunity for community involvement. Does Jenna's sketch give you any ideas? I didn't think so. The Bees are really hoping to be a part of this for a second year, so cross your fingers for us!

And the question that we've been asked most often lately - will we be putting on another Summer Craft Fair?  Honestly, we're still figuring out the logistics of this, as we've lost our beautiful location from last year (very happily to CBC) and it's caused kind of a snag in our plans. If not a full scale craft show, be sure to look out for some smaller trunk shows throughout the year. Either way, we'll be sure to keep you updated on our plans.

Thanks for following us during our first exciting year! We look forward to what 2012 will bring for us all.

Tuesday, 7 February 2012

A Bee Abroad


In October, I temporarily left the hive to move to London, England, while I study for my master's degree in textiles at Chelsea College of Art & Design. I chose Chelsea because its Textile program has a focus on sustainability, which is becoming an increasingly important aspect of my work, and outlook on life. Chelsea has an unique research centre, TED (Textiles Environment Design) which is part of a larger partnership with Central Saint Martin's called the Textile Futures Research Centre. For anyone interested in textiles in general and sustainability specifically, explore both their websites for volumes of fascinating research and inspiring projects.


My MA project focuses on natural dye printing, something with which I've long wanted to experiment. So much of my own work and teaching involves screenprinting, and as much as I love the beautiful effect of printing with conventional fibre-reactive or acid dyes, I worry about the long term health and environmental effects of all the chemicals involved in the process. I've had a lot of experience using natural dyes for immersion dyeing, some of which we've shared with you here on the Beehive, but little experience with using natural dyes for printing. I had a sense of how they might work for printing, but I'd never really tried to use them.

I thought the perfect way to begin would be to take a workshop at the Maiwa Symposium in Vancouver, which is also something I've always longed to do but could never fit in, as the symposium falls during the fall school term. The workshop at Maiwa gave me the confidence to get going!


Since arriving in London and settling into the studio at Chelsea, I've been experimenting with the colours I can produce using the various natural dye extracts available from different sources. Maiwa, Couleurs des Plantes, Couleur Garance, Earthues and Pure Tinctoria all sell a variety of ready-to-use natural dye extracts from ethical and sustainable sources. The extracts are relatively easy to use as they dissolve in water, but you can also make your own extracts from dried or fresh dyestuffs.

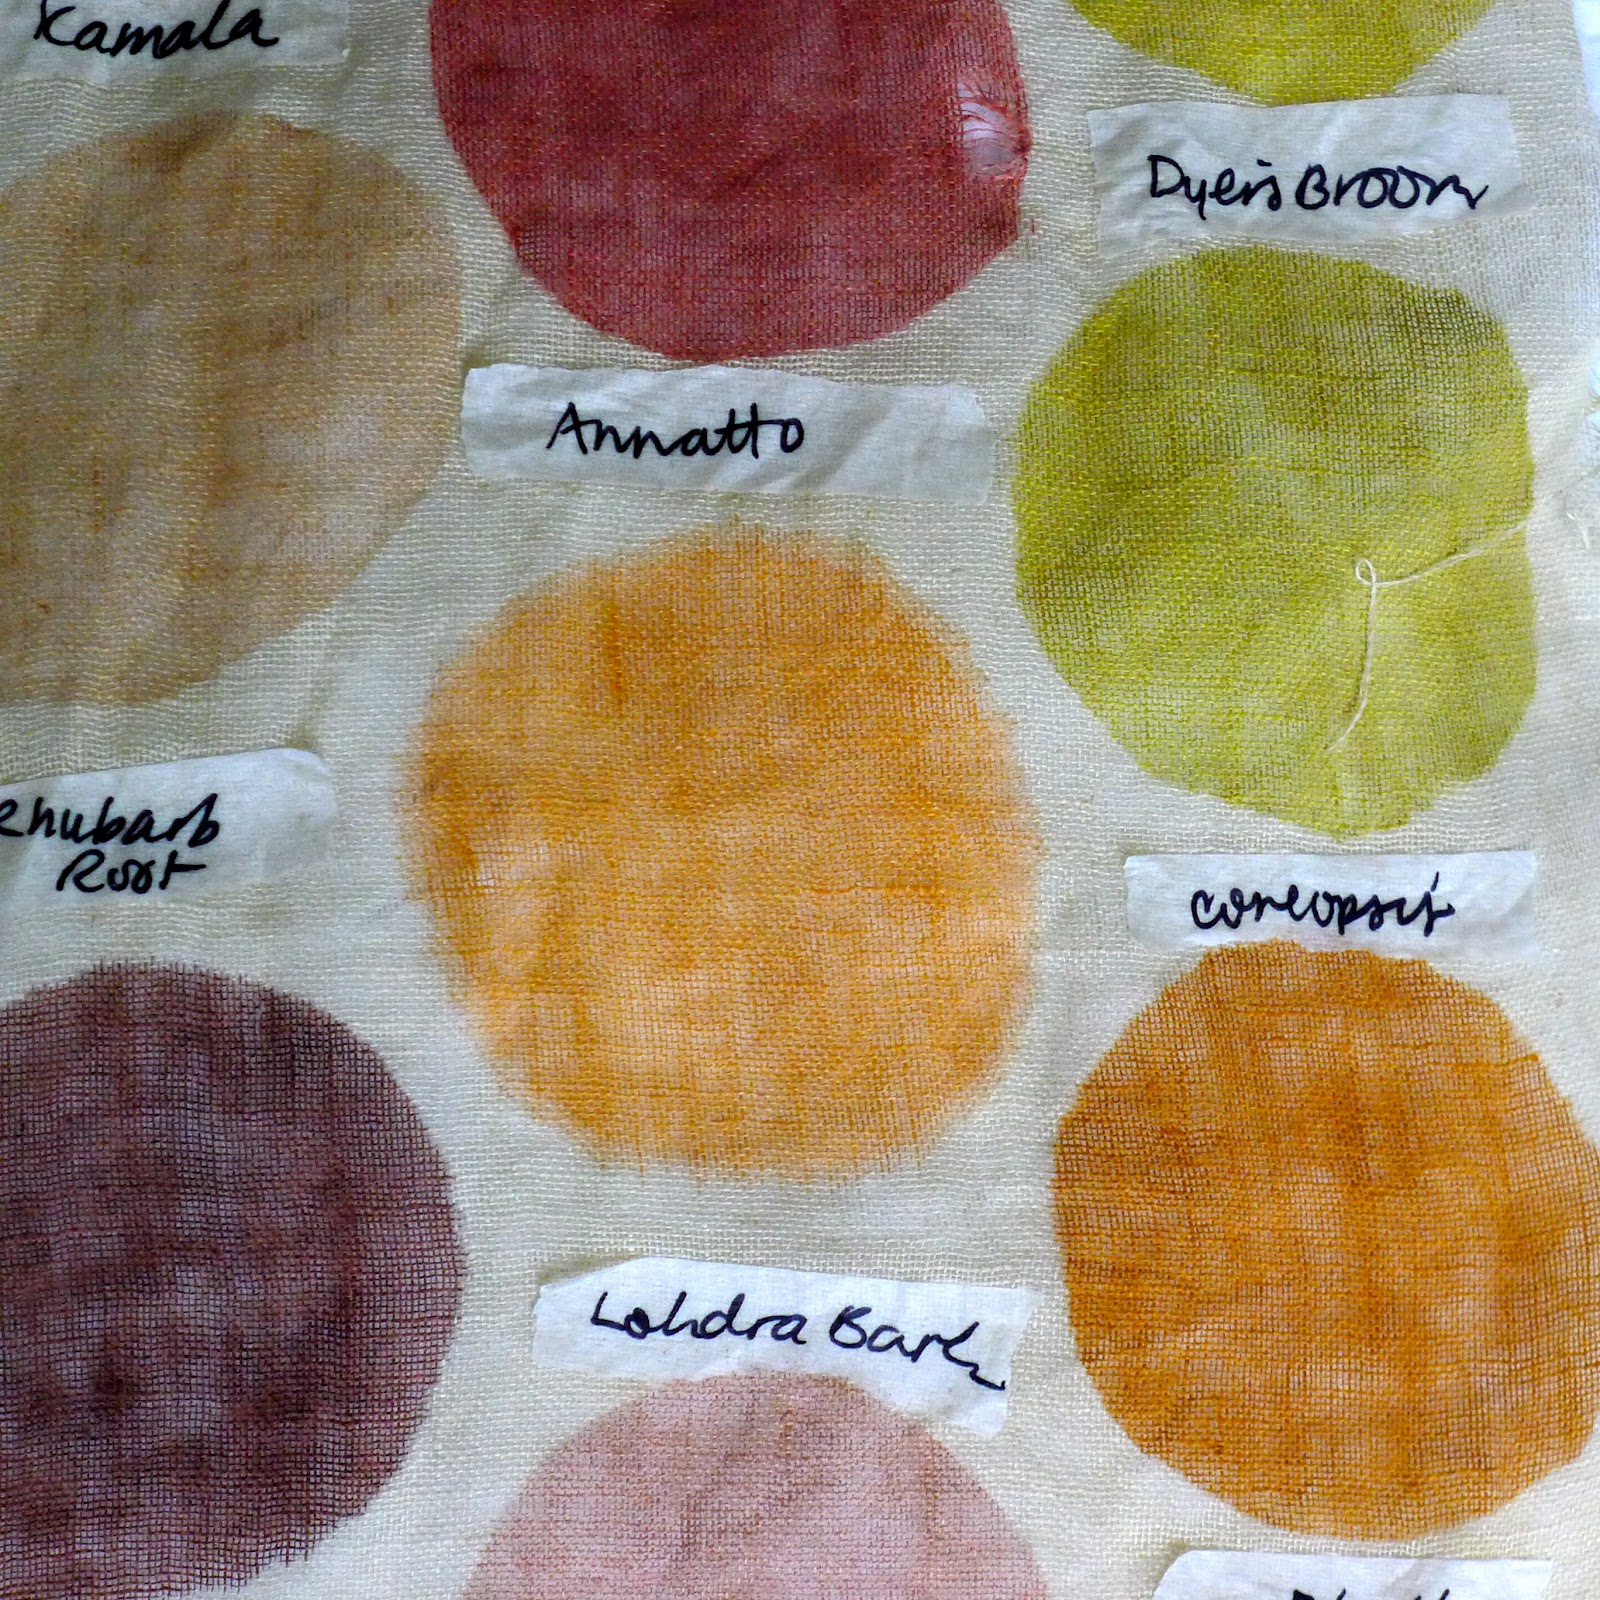
I thicken the extracts with a gum to produce a paste appropriate for screen printing. So far, as I'm only in the early stages of testing, I'm stencilling the print pastes onto mordanted cloth rather than screen printing, which will come later. The colour testing will also involve pushing the range of hues by shifting colours by adding acid, alkaline or other mordants to the colour after it has been applied. What you see here are some of my early samples in progress, which give you an idea of the range of colour you can achieve using all natural colourants, all derived from plant and a few insect sources.


A large part of my investigation is researching the plants that produce dyes, and their chemical, cultural and economic histories. I've been making ink and crayon drawings of these plants from historical herbaria (scrapbooks of preserved dried plant specimens) to develop imagery which I will later use in screen printed patterns.

When I return home, I hope to share my newly gained knowledge with anyone wanting to learn more about these precious and wonderful sources of colour. Read more about my project over the next 6 months as it progresses on my blog, now up and running again after months and months of neglect!

Thursday, 2 February 2012

A New Dress


I'm not totally sure how, but as a mother of three small children I can find time to sew - usually things for the kids. Projects range from clothes, bibs and quilts to dolly diapers and dress-up costumes.

I was recently given a gift from a friend who specifically said that I am always making things for everyone else, so now I can make something for myself. I was so excited to recieve a Colette Pattern, not only to make something for myself, but also because these patterns are simply beautiful to look at and hold. Well printed on good paper in a compact little booklet. The pattern was simple enough for a hobbyist sewer to follow.


The Macaron Dress has what they call a "sweetheart top with a contrasting top yoke." I just call it cute.

I like the pattern so much, I decided to trace it onto freezer paper before cutting it out. This took more time, but I think it was well worth it. Within two days, I had assembled the dress, with a few little distractions.


My favourite part in any dress is finding out it has pockets, so when I noticed the pockets in my pattern I was over the moon. When I finally tried it on, I found it a little tight in the bodice, but letting out the seam allowance fixed it up great.

I am very pleased with this pattern, and I am definitely going to sew it again and again, now I am just searching for the perfect material.


I would highly recommend Colette Patterns, and if you head on over to their website they have a lot of really informative tutorials.

And if you live in the Hamilton area, You can check out Needlework, rumour has it they will be carrying Colette Patterns! Their grand opening is February 10th at the James St. North Art Crawl.

Wednesday, 25 January 2012

The Bees at Home: Projects in Progress II

We're into January now - one of the best times for crafting. There's snow on the ground (sometimes, at least!), and the air is cold, so sometimes it's nice to just stay in and make something. We thought we'd catch you up on on what's going on in some of our craft spaces...

First, Jen is making this amazing 'junk mail cross-stitch'. She brought it to knit night on Wednesday, and was explaining some of her reasoning behind this little project. One of the 'men of the beehive' is a mailman, and it's really personified the postal system for her. Thinking that the postal workers probably see a lot of 'no junk mail' posters', she wanted to add some personal time and energy to her sign. It also relates the very tactile quality of sending mail and that of cross-stitch. It's so great, Jen!

(The book she used for the alphabet patterns can be purchased here.)

As you might know, part of our identity in the Beehive is 'homesteading' - participating in a lifestyle of  sustainability and self-sufficiency. It's been amazing to see different members of our craft collective tackling these amazing and practical art forms of old, like canning, mending, natural dyeing, farming, and now weaving! Hollie is in the middle of a weaving class and has so far wrapped about 1700 metres of textile, prepped the loom, and should start weaving next week.


In other very exciting news, our very own Jenna Rose was a Featured Seller on Etsy last week! Jenna's handmade housewares and accessories are so beautiful, and regularly and proudly sported by members of the Beehive. Everything she makes is hand screen printed in house, and the illustrated designs are thoughtfully created by Jenna as well. I could go on and on, but the Etsy interview is a great read, so make sure you check it out here.


Lastly, you can always count on Kate to be working on at least one (but more likely three or four!) amazing project...this time it's paper piecing with hexagons. Basically, paper piecing is a hand-sewing technique that is used to improve accuracy when working with shapes that have difficult angles. You fold lightweight cotton around paper templates, and baste them in place. Once everything is whip-stitched together, you press the whole piece, remove the basting, pop out the paper pieces and voila! Super cute quilt top/pillowcase/placemat/table runner/whatever you want.


So, there are a few things that are going on in the background, here at the Beehive. We'd love to see what you're working on at home, or which projects you have on your radar. Just post your link in the comments. Happy crafting!

(You can see 'Projects in Progress I' here...)