Showing posts with label Recipe. Show all posts

Thursday, 22 August 2013

Mustard Making!


We made mustard! This was something that had been on our to-do list for a while, and with sausage season just around the corner, we decided it was time to give it a try. How we usually do things in the Beehive is that we choose a recipe, make a list of ingredients, and then call dibs on whatever we have already in our homes. We had everything that was needed on hand except the actual mustard seeds, which were purchased from Dilly’s at the Farmers Market (the yellow seeds) and Nations (the black seeds).


We all sat around the table, passed around the ingredients, and put them into our little jars, each making one cup of each mustard. This whole process took…about 15 minutes. For some silly reason we thought this whole mustard-making-process was going to be intimidating and tricky, but it was literally just measuring ingredients into a jar…and that’s it! So we ordered some pizza, grabbed our crafts, and had an impromptu Beehive meeting.


Then we waited 3-4 days, blended our concoctions at home, and reported on our findings. A few people found the lavender mustard a bit acidic, which might be because we substituted the water for white wine (assuming everything is better with wine – maybe not?), but other than that, the mustards turned out just lovely. I blended the yellow mustard and it was perfect (so flavorful!) but I’ve left my lavender mustard unblended for a few weeks, just to see what happens with some more time.
Here are the recipes we used:
Know of any tried-and-true mustard recipes? Feel free to share them in the comments!

Thursday, 20 December 2012

Just in Time for Christmas...

Christmas is only five sleeps away! Or if you're on track with your Advent calendar, it's only five chocolates away! If you're looking for a last-minute gift for someone special, there's really nothing better than a beautifully wrapped package of handmade treats. This is the perfect gift idea for a neighbor, a co-worker, or your favorite barista!


We got together a few weeks ago and made an absolutely amazing Christmas treat - holiday brittle! This is not your average peanut brittle. It's flavored with cardamom, which is the same spice used in chai tea. In other words, the taste reminds you of cozy, warm holiday deliciousness. And instead of peanuts, we used pepitas which are hulled pumpkin seeds (and it's just a really fun word to say). This brittle is super yum, and we promise it will be a huge hit with your gift recipients!

We used this recipe, and have no fear - we found the whole process very simple.

Ingredients needed:
2 cups of sugar
4 oz. of unsalted butter
1/3 cup of light corn syrup
1 cup + 2 tablespoons water
Have the following items ready and close by:
1/2 teaspoon of baking soda
2 teaspoons of coarse sea salt
1 teaspoon of ground cardamom
1 1/2 cups of raw, unroasted pepitas (we got these from the Hamilton Farmers Market)
(mix these last two ingredients together)

Have two baking sheets ready, lined with silicon mats. Just mix the sugar, butter, corn syrup, and water over medium-heat until it thickens and becomes "medium-golden-amber". Now, I'd say the trickiest part of this recipe is knowing what "medium-golden-amber" is, but go with your gut. The recipe said it takes 10-15 minutes, but I'd say it took more like 25 minutes before we could confidently say it was the right color.


Take a swig of your warm apple cider - this is the part where things get real. Remove from heat, then immediately stir in baking soda, followed by sea salt (beware of crazy bubbles!), followed by the cardamom/pepita mixture. Quickly pour the mixture on your baking sheets, and try to spread it evenly. Hurry hurry, as it will start to harden immediately! As you can see, we had all hands on deck for this part...


Do some crafts while you let it cool - it takes about 45 minutes to an hour to fully cool. Then go ahead and break it up into pieces! You can store for two weeks in an airtight container, and its very helpful to use parchment paper between the pieces to keep them from sticking. And don't forget about the pretty packaging!

Oh, last thing - Kate really loves cats, and apparently, while we were making brittle, I really liked taking pictures of Kate with cats. I contemplated writing a post specifically about Kate and her love of cats, but I thought I'd spare you...


Merry Christmas, friends!

Tuesday, 23 October 2012

That's What She Said.

Last Wednesday evening, the Beehive gathered to make sausages. Oddly enough, the sausage making party may be the perfect ladies’ night activity! Guaranteed fun, deliciousness, and, yes, naughty innuendos aplenty (resistance on this last element is futile). We found this to be a surprisingly simple food craft with extremely gratifying results.


I got a hankering to make sausages during a visit to Joseph Schneider Haus, a German Mennonite museum and gallery in Kitchener, Ontario (mentioned in a previous post) when chatting with resident pioneers about their preparations for a Butchering Bee the following day. In a nutshell, this harvest season Mennonite festival involves butchering whole pigs, creating sausages from the appropriate parts (e.g. the fatty pork shoulder), and smoking them in cotton casings in a smoke shed. The rest of the Bees were equally smitten with the idea of making and smoking sausages, and we decided to start simple, getting the hang of making fresh sausages from ground pork as a first step.


We were lucky enough to have a couple of local connections to get us outfitted for the task. A Mennonite friend’s parents, veteran sausage makers, had an extra manual stuffer - a real cast iron beauty patented in 1889. Ray at Jepson’s Fresh Meats in the Hamilton Farmers Market enthusiastically supplied us with quality ground pork shoulder, natural, dry-salted, tubed casings, and much guidance on preparing the casings and other hot sausage tips. The Market also provided seasonings for an Italian sausage recipe which included fennel seeds, garlic, red pepper flakes and parsley.


After soaking the casings in warm water for two hours, we measured the seasonings into two large bowls - one ‘mild’ with fewer chilli flakes and one ‘hot’ with more. We then added the pork (divided equally among the bowls) and mixed the ingredients thoroughly by hand. It is important to ensure that the seasonings are well integrated to avoid biting in to a dense pocket of garlic or chili flakes!


At this point we formed a patty from each bowl to taste-test the mixture and check that each batch was well blended. We were all pretty blown away by how delicious it was and were excited to keep going on our sausage making journey.


We brushed the removable stuffing horn (inside and out) with oil to ease the passage of the meat, re-inserted it through the stuffer and carefully loaded the casing on to the horn. The casing is fairly sturdy but can suffer some wear and tear if handled roughly. After seasoning the stuffer with oil, we loaded up our first batch, packing down the meat to avoid air bubbles. Employing slow, methodical turns of the crank we eased the meat in to the casing. The key to plump sausages seemed to be lightly pinching the casing on the horn to offer some resistance, allow the casing to fill up more slowly. Otherwise you could be looking at slightly limp sausages, which is a common issue for beginners. ***Just try to read the preceding paragraph without blushing a bit…and you will get an inkling of the level of giggling that went down the evening of our sausage session!***


To form the links, start by twisting towards you 4 or 5 times, and then away from you at the next junction. I will confess that we did something somewhat unorthodox – we twisted our links as they came out of the stuffer rather than filling the entire casing tube with meat and then twisting off links. Our sausages turned out fine, though next time we will hold off on twisting until the end - which may result in more consistent lengths and control over the density of each sausage (looser portions can be made in to shorter links to fill them out a bit more, denser ones can be made longer).

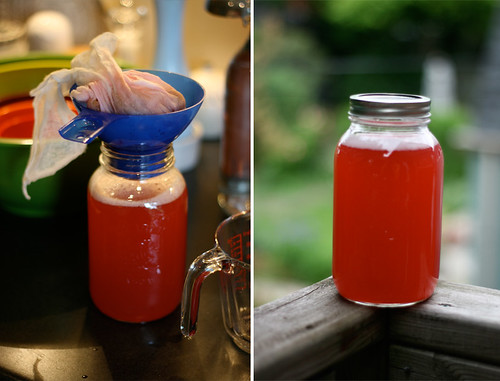
We coiled our sausages on a large tray as they came out of the stuffer, transferring them to bowls in the refrigerator when a length of links was complete. The links can be left in the fridge for several hours or overnight before cutting them to ensure that twists have set.


After giving some to our host, Kieran, (whose open concept kitchen is a dream to work in) we each walked away with about eight succulent, handmade sausages, and quite possibly an addiction to sausage making. We have fried, BBQued, and sautéed them for pasta sauce with delicious results. After trying several more recipes I am confident we will be ready to graduate to smoking and a Beehive Butchering Bee. Stay tuned!


Tools and supplies

Large bowl or bowls for meat and storing finished sausages
Sterile gloves for meat handling (optional – clean hands if you’re not fussy!)
Tray to collect sausage
Sausage stuffer – manual or automatic
2-3 sausage casings (natural, dry-salted, tubed casings recommended)


Italian sausage recipe makes about 80 medium sausages

20 lbs Ground Pork (sausage grade pork contains about 25 to 30 percent fat and is frequently mainly pork shoulder)

8 Tbsp Diamond Crystal Salt
4 Tbsp Fresh Ground Pepper
12 Tbsp Dried Parsley
10-20 tsp red pepper flakes (we used 5 tsp in one batch, 10 tsp in the other. Upon review we felt that for truly hot sausages, the hot one could have used 15 tsp of flakes)
20 Garlic Cloves, minced


Sausage Party Quotables:


"I really like touching meat, guys."

"Time to lube the stuffing horn. Meg! That's all you!"

"They're a little flaccid"... "It's not you, it's me!!"

"It's humongous!" "It's engorged!" "It's accurately sized..."

"Think about a bun..."


photos by Hollie Pocsai, Kate Hunter, and Meg Makins

Wednesday, 6 July 2011

Bee's BBQ


When I wrote this, Mel (one of our very own Bee's) was about to have a baby, but right before I posted I found out that little baby Margaret Jane was actually born early this morning! How exciting! A few weeks ago, we thought we'd celebrate by hosting a Beehive BBQ in honor of this little one.

We gathered at Kate's place, and had a lovely time chatting, and enjoying so much amazing food. Kate made a totally delicious rhubarb rosemary spritzer (you can find the recipe on her blog, here).

rhubarb

The rhubarb spritzers were wonderful, but my personal highlight of the meal was Kate's fiancé, Erick, rocking the BBQ. He grilled veggies, Black Walnut Lane sausages, and divine rosemary chicken burgers - amazing! All of the meat came from local farmers, and you could taste the difference. Everything was so yummy!


It was just so nice to sit together in the afternoon sun and, instead of talking about the craft fair and our knitting project, we just got to relax and learn more about each other. We even invited the boys to this event - that's a first!


The BBQ was completely delectable, and so much fun. By the end of the of the evening we broke our own rule and started talking Beehive projects. We can't help it, it's just too exciting!

Perhaps we should just make all of our meetings barbeques?

Photos courtesy of Meg and Kate

Tuesday, 26 April 2011

Cookies for Breakfast?!

For the past year and a half I have been commuting to Oakville for work. During this time I have been constantly looking for a convenient breakfast option that is easy, tasty and not full of garbage. I have finally found it:

The Breakfast Cookie.
I found this recipe on Canadian Living and have tweaked it to suit my taste and pantry. You could make endless variations of this cookie. When I was substituting I kept in mind the original ingredient and tried to match the texture and consistency.

What I used to make one batch of 36 cookies:

2 eggs
½ cup liquid honey
¼ cup butter, melted
1 cup grated carrot, packed
1 cup unsweetened shredded coconut (I have a sensitivity to nuts so did not use walnuts)
½ cup dried cranberries (instead of raisins)
½ cup finely chopped apricots
½ cup chopped dates
½ cup chopped dried apple
1 cup all purpose flour (this time I used whole wheat)
1 cup minute oats
¾ tsp of cinnamon
¾ tsp of nutmeg
½ tsp of baking soda
¼ tsp salt
1 cup of granola (instead of cereal Os)

Preheat your oven to 350 F with the rack set at the top and bottom thirds.
Next, line your baking sheets with parchment paper, I used tin foil as I never seem to remember to pick up parchment paper.

In a large mixing bowl whisk together the eggs, the honey and the melted butter until smooth. Then add the carrots, the coconut, the cranberries, the apricots, dates and the dried apple. Using a large spoon mix everything together until everything is wet.


In a smaller bowl combine the flour, the oats, the cinnamon, the nutmeg and the salt. Once mixed together stir in the granola.


Add the dry ingredients to the wet and mix together well till all the flour mixture is incorporated.


Spoon out about 1 tbsp of batter and form it into a ball. I make mine about the size of a two bite brownie. Place them about 1” from each other on the cookie sheets. You should be able to fit about 12 per sheet.


Place in the oven and bake for 15 minutes , until they are slightly browned and are firm to the touch. I put two cookie sheets in the oven at once switching racks after 8 minutes, then leave them in for another 8 mins.


Once they are done, remove them from the cookie sheet with a lifter and place them on a rack to cool. When they have completely cooled place them in an air tight container. They will keep for a few days on the counter, a week in the fridge and two weeks in the freezer.
These little cookies really pack a punch and you will be surprised that you are full after only two.